Wednesday, March 24, 2010

Glam Garden Fabric Giveaway at True Up!


Just wanted to do a quick little post to let you know that Kim Kight over at True Up is hosting a Glam Garden fabric giveaway! Kim graciously invited me to guest blog post about my creation and inspiration process behind the creation of each Glam Garden print as well as the photo shoot {thanks Kim!}.


Robert Kaufman Fabrics is sponsoring this guest blog by generously giving away two fat quarter packs of the Glam Garden fabric collection –- one fat quarter pack for each colorway, Spring & Summer!
To enter, please name your favorite print and colorway from the Glam Garden collection in the comments. You can see all the prints with their colorway info on the Robert Kaufman website. Winners will be drawn randomly next Wednesday, March 31, 2010, around 3pm Central US time. This giveaway is open to readers worldwide.
Good luck everyone!!

Sunday, March 21, 2010

My Print Inspiration & Research Process


I thought I would go ahead and share with you my print research and inspiration process! Things you've got to know about me are that I am a researcher. I live for research - well print and color research that is! It fuels me and inspires me and I love to review and collect information.

I work in the fashion industry, and for about six years my job entailed researching print and color trends, and then creating prints for our line based off of those trends. My responsibilities involved predicting trends for our product lines 8+ months out, creating color palettes for our buying team to choose from, designing color boards and print trend reports based on my findings, and then I would present this information as well as supporting prints, to our team and buying team. Ok, that's the backstory of where my obsessive researching all started! : )


With that said, I looooove books and magazines! Jake and I frequent Barnes & Noble, and with chai in hand, I sift through the new magazines that come out each month. Sometimes a few come home with me, if there is enough amazing print or color inspiration inside them!

I subscribe to a bunch of fashion magazines: Vogue, Bazaar, InStyle, Lucky, Teen Vogue, etc. and always pick up Boho mag from the newsstand as soon as it comes out. Other magazines I frequent on my trips to Barnes & Noble that usually come home with me are: Marie Claire Idees, Ideal Home, Living Etc, Do It Yourself by Better Homes and Gardens, Sew Hip, Computer Arts, Martha Stewart Living and Martha Stewart Weddings. There's a TON more magazines that catch my eye that I pick up and sift through too, but these are the ones that are always in my arm, heading to the table to peruse.


Years ago, I found myself saving whole magazines when there was juicy print inspiration inside. I would tag the pages, and then never go back to them because the following month's magazine would be out and I would be on to something new. Of course I didn't want to toss my magazine stash, knowing that there were goodies still inside! So after having to move my magazine library a few times, I finally decided - I would rip out the pages I wanted.


That was a very fun and freeing feeling! I would rip out the pages, then recycle the rest of the magazine. Suddenly my load was much much lighter! But then my stack of magazine tears started climbing high, so I started organizing them into different categories. My print inspiration categories include things such as hand-drawn florals, graphic florals, geometrics, medallions, paisleys, stripes, plaids, wallpaper prints and the like.


Well, of course I couldn't live with them in their stacks! Sifting through pages and pages of inspiration, when the inspiration would only be a small portion of the page just seemed like it wouldn't be very inspirational after all, and would take so much time to find anything.

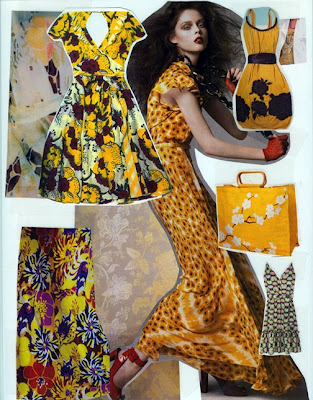
What I end up doing is clip out the part of the page that has the inspiration piece on it that I like. I purchase a ream of white cardstock (cheap but sturdy), tape, comfortable scissors, sheet protectors and binders. I then organize my clippings on a page and group them by color, hand or print feel and tape them down.

Once a page is done, I stick it into a sheet protector and then into a binder. My binders are organized by print theme, so when I am ready to start creating a "wallpaper" print, I'll pull my inspiration (clippings, books, etc) for a reference and begin drawing away!


Mind you, I am a stickler for going off on my own and creating original artwork. I am totally against copying someone else work - that practice outrages me! I have my style and create what I like according to my style and personal interpretation. When I look at inspiration I may be inspired by the concept, such as for a wallpaper print "Oh, I like how there is an outside element that wraps around the center design, and how the outside element has a texture inside of it". Then I go off and draw my own motifs keeping in mind what inspired me, and then deviating from that path as my print develops. Inspiration is used as a starting point, and I always recommend pulling inspiration from 3-8 different sources.


I've been creating my print inspiration binders for about 5 years now, and have a few binders and a hundred plus pages full of beautiful inspiration that makes my mouth water whenever I go through them! I'm still in the process of getting my binders up to speed, as I'm tearing out more inspiration than I'm categorizing! I think my goal will be to spend time building my inspiration library once a month so I stay on top of things and don't get inundated with tears, like I am now!

I also do this process for color, and will be sharing that with you soon as well!

How do you organize your inspiration? What type of inspiration drives you? What are your favorite resources? What tricks have you found that help you keep on top of it all? I'd love to hear!!

Wednesday, March 10, 2010

Alexander McQueen's Final Show


The world was able to see Alexander McQueen's final Fall 2010 runway show, after all, and for that I am very grateful. I wanted to share his final collection with you as it is exceptionally exquisite and has such an awe inspiring medieval beauty and romanticism to it. I will let his work speak for itself. I hope you enjoy the beauty he created. His creativity will be greatly missed.

The review of McQueen's show, written by Sarah Mower at Style.com says, "Sarah Burton, his right hand, described how, in beginning this collection, McQueen had turned away from the world of the Internet, which he had so powerfully harnessed in his last show. "He wanted to get back to the handcraft he loved, and the things that are being lost in the making of fashion," she said. "He was looking at the art of the Dark Ages, but finding light and beauty in it. He was coming in every day, draping and cutting pieces on the stand." The 16 outfits shown had been 80 percent finished at the time of his death."

That in itself is inspiring to me - to take time to turn away from the Internet and to spend time creating from within yourself...to return to the handcrafts you love and that are becoming lost.

Sunday, March 7, 2010

Glam Garden Photo Shoot Process


Now that the Glam Garden photo shoot over, I thought I'd share a bit about how the day went, what I've learned in the process, and the people who have helped me along the way!

First off - Sewing the garments in the fabrics
To be honest, I'm not a huge sewer. Since I work full time, I have limited time, and that time is spent creating artwork. However, since I've designed fabric collections, I have jumped right in and start sewing away! I knew that if I got into fabrics that I would absolutely need to sew them into garments because I feel compelled to tell the complete visual story of the collection.

With Glam Garden, my friend Cheryl (who sewed almost all of my Hot Blossom samples last time) sewed 2 of the 8 garments for me, which was a huge help! Then I tackled the other 6. I have to say, this time around I was getting faster and understanding the terminology much better. Still far from being pro, but I was able to get through them with minimal seam ripping (=growth)!

Here's what I learned how to do this time:
Put in an invisible zipper and a regular zipper, gathering and ruffles, pleats, sew on sequin trim, sleeves and armholes, put in an elastic casing, inset and applied necklines, and lined bodices. Whew! I get tired just thinking about it. I think my sewing brain grew 8 sizes during those 3 weeks of sewing!


The week before the photo shoot, I had a "free" evening and wanted to make an extra prop, so I designed and sewed together this ruffle pillow. Someday I will put together the instructions for you and offer it as a free download on my website.

So I wanted to take a minute to answer some questions that I seem to get often. It's always fun for me to see what people are interested in. The questions? "What sewing patterns do you use for your photo collections?", "Do you design them yourself?", "Where can I find them?", "What do you do with the garments when the photo shoot is done?". So, I thought I'd answer those questions right here for you.

"What sewing patterns do you use for your photo collections?" and "Where can I find them?".

I actually use Simplicity sewing patterns because they have more modern designs such as Project Runway and Cynthia Rowley (which I HEART!!). If you go to my website, I have posted all of the sewing pattern numbers that I used in both the Glam Garden and Hot Blossom collections, under the Inspiration page. All of the sewing patterns can be found at your local sewing store.


"Do you design them (the sewing patterns) yourself? They look so hip!"
Why thank you! As mentioned above, I don't design them myself. However some day if I can make it in this industry I would absolutely LOVE to design sewing patterns and put out a line that is modern and feminine for the younger generation (20's & 30's)...someday. I would definitely need to be partnered with a fabulous technical designer who can write the instructions, do the technical drawings and grade the patterns. {Any takers?}


I do spend a lot of time deciding which pattern I will use and which fabrics I will use with that pattern. I scan in the pattern's technical drawing and put my fabric designs in them, in Photoshop, so I can plan out my "line" before starting to sew.


"What do you do with the garments when the photo shoot is done?"
Well, sadly for some, they sit in my closet. However, I do think that I will pull some of them out this spring to wear them. To me they are like things I would put in a hope chest or something just because of the memories, and being able to see and keep something sewn-up in my fabrics is quite sentimental to me. I work in the fashion industry so I do get to see my artwork on garments already, but this is a bit different because the artwork that is on the fabrics I was able to create myself without an art director.


I also wanted to let you know who helped contribute and make the photo shoot possible to offer them a BIG thanks!

For a free pattern for the Glam Garden fabric collection for Robert Kaufman, I collaborated with my friend Karin {fashion designer} on the Luscious Bow Tote which is on my website as a free download, and also on Robert Kaufman's website. She wrote the instructions and did the technical drawings for me, which was a lifesaver!

Tina Michalik designed the Big Zag free pattern download for Robert Kaufman for my Glam Garden fabric collection launch. Not only that, but Tina graciously sent me her quilt so I could use it in my photo shoot!

Danielle Howarth from Dani Bags Boutique contacted me and offered to make me a bag from her Sophia Collection for my photo shoot, which was awesome! It turned out SO beautiful!!! Now SHE is an amazing sewer. It looks completely professional!
{Dani Bags Boutique - Handbag from the Sophia Collection}

My friend Amelia just opened up her home to teach yoga in Seattle, and offered her home to me for the photo shoot, which was perfect because she is quite the minimalist so the house was like a blank canvas for us to use! And if anyone is in Seattle and looking to do yoga, find Amelia. She can do things I didn't know were possible and is quite the amazing teacher!


My aunt and cousins came over one night to make the adorable tissue paper pom pom's that you see in the photo shoot, which turned into a really fun time being able to catch up with the girls and be crafty at the same time!

Natalie Grummer from natalie g. | photography did my photo shoot again. I absolutely love the lightness and airiness of the photo's! My cute friends braved the modeling adventure again, and my wonderful sister-in-law came to help set-up and offer support.

And of course, last but definitely not least, my amazing husband who jumped on board to do anything and everything that was needed to make it all possible and not have me fall apart in the process. I am so thankful for his eagerness, positivity and support. {Thanks Jake : ) }

So, yes, it took a small village to pull things off. I did learn however that I will need to get a bigger village to help the next time - that was my big lesson this time around. Ask. For. Help...even if it's hard to do so!

Perhaps next time I would like to solicit some help from people who are great and fast at sewing-and of course to be able to contribute to another person's business {love!}. If you or someone you know are avid sewers, please do e-mail me at hello@josephinekimberling.com along with your contact information, photo examples of your skills, and price so I can keep you on file and contact you in the future! You. Could. Save. My. Live. Seriously!

For more behind-the-scenes information about my Glam Garden photo shoot, stop over to Robert Kaufman's blog The Swatch and Stitch.

Well, thanks for coming along and reading along about my journey! I hope you enjoy my new Glam Garden fabric line, pictures, free download and inspiration!

LinkWithin

Related Posts with Thumbnails