Friday, September 28, 2012

Rainbow Bright


This morning as I was waiting for the sun to rise, I looked out of my window and saw this gorgeous rainbow peeking through the fog and mist. I've never seen one show up in such a hazy sky before. Isn't it beautiful?! Just thought I'd share some prettiness with you this Friday morning. Have a good one!

Friday, September 14, 2012

Hope Chest Sewing Detials - Part 2

I'm back as promised, to give you the rest of the sewing details from the garments we made for my Hope Chest photo shoot! The following include some of my FAVORITES!

PROJECT IDEA #5
This pattern is Vogue #V1255 by Rebecca Taylor, and uses my fabric Cross Stitch Roses in Red. This is one of my favorite garments as I love the ruffles on the tunic, and think this print fits the look and feel of the garment really well! This tunic has ties on the side, but I belted it for the photo shoot to add more waist definition. Also, I quickly made a rustic looking necklace to add to the look by stringing an old key I bought from BHLDN on a leather necklace. Add some skinny jeans and boots, and you're set for fall!
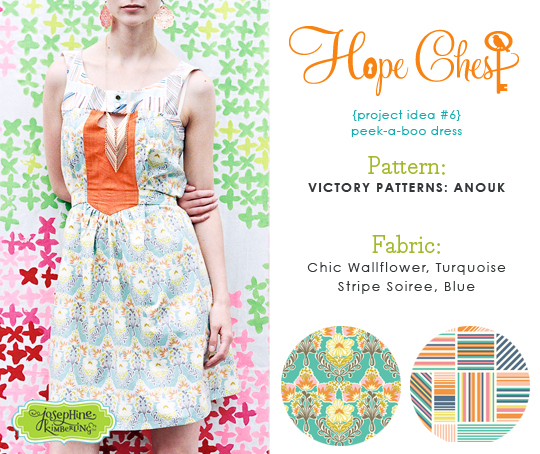

PROJECT IDEA #6
This dress was made from Victory Pattern's Anouk sewing pattern and use my Chic Wallflower, Turquoise and Stripe Soiree, Blue fabrics. I love this sewing pattern because you can make a top or a dress from it - both of which are super-cute and great additions to your closet! I also love the ties that allow a waistline to be added to the garments.

Since I was already using 2 different fabric patterns, I thought it would be too much to add a third, so I used an orange solid fabric for the center area. However, in the photo's with the Anouk sewing pattern, I love how they use a stripe here, and how it gets all 'chopped up' with the sewing details. It's nice that there are so many different ways you can create these garments.


PROJECT IDEA #7
This gorgeous dress is made from Simplicity #1802 by Cynthia Rowley, and uses my fabrics Hope Chest Floral, Blue and Flower Bed, Blue. I must say that is is my absolute favorite! It's so gorgeous in person it's not even funny. My sewing master Karin sewed this one up and used flat yellow piping to nicely contrast all the different sections. I decided to use the Hope Chest Floral, Blue in the center godets, instead of Flower Bed, Blue as I thought this would make the dress look more pulled together.

I made a fabric pouf out of Geometric Crochet, Blue and attached it to the dress to add a little more whimsy.


Project Idea #8
For this dress I used Simplicity #1939 by Cynthia Rowley and used 4 different fabrics to create a patchwork look. The fabrics I used are Hope Chest Floral in Olive for the main print, and also used it in the skirt patchwork along with Stripe Soiree in Olive, Chic Wallflower in Pink and Geometric Crochet in Citron. The patchwork isn't included in the sewing pattern, but I just sewed together 11" x 12" rectangles, 8 across and 3 high, with a 1/4" seam allowance. If I had to do it again, I would have made the rectangles 10 across, so they were a longer and skinnier rectangle and allowed for a 5/8" seam allowance.

To be honest, this dress was a tricky one to make look fabulous. Maybe it's my personal opinion or aesthetic, but when dresses are tight around the waist it can look way '80s which I don't love. I chose to make this dress though so I only have myself to blame! Thankfully this model looked terrific in it and was able to pull it off.

I do think the top portion of the dress is fantastic and would be great as a top tucked into skinny jeans. I had brought my sewing scissors to the photo shoot prepared to chop this dress up on site to turn it into a top just in case it didn't work as a dress. Also, to make the dress look more updated, we bubbled the front hem of the dress under for a high-low hem. In the end, I think it turned out pretty good!


Well, that brings me to the end of sharing with you the sewing patterns my friend Karin and I made for my Hope Chest photo shoot! I hope you enjoyed hearing a little bit more about the process. To see more garment details from this photo shoot and my previous ones, please visit my Inspiration page on my website.

Which garment out of the 8 is your favorite and why? I'd LOVE to hear!!

Friday, September 7, 2012

Hope Chest Sewing Details

Hi everyone! I thought I'd share with you some of the garment sewing details, from my Hope Chest photo shoot. Did you know that on my website's inspiration page, I include each of the garments we made for each collection, as well as which sewing pattern was used and which fabrics too? Since I've gotten some requests, I thought I'd go ahead and share more info with you in this blog post.

My goal when creating a fabric collection has always been to create patterns that can be worn. Having fashion in my background has caused this to be a passion of mine. When I set out to find sewing patterns to use for each photo shoot, I strive to find things that are fashionable and current with today's trends, as well as put my prints together in a way that would inspire women to feel beautiful and well put together when wearing them.

Here's some sewing details for you!

PROJECT IDEA #1
This pattern is from Victory Patterns, which is a new company I discovered while scouring Etsy. The name of this intermediate pattern is Ava, and it's just gorgeous! I used my Hope Flourish, Pink fabric along with some white netting for the neckline and sleeves, which I left with a raw edge. I made this one myself, but needed help from my expert sewing friend for the center sweetheart point connecting the mesh to the printed fabric top. I love how it turned out! Such a great top!
 

PROJECT IDEA #2:
I just love all the peplum styling details that are out now! They are super flattering and feminine, which I love. For this garment, I used Vogue #V8815 by Rebecca Taylor and my fabric Cross-Stitch roses. This sewing pattern is labeled 'very easy', however my sewing friend decided it would be best to line the top with matching white fabric, which I think made it look it's best. She positioned the fabric so that I could cross-stitch on top of the printed cross-stitch rose design, and I tied a hot pink double sided satin ribbon around the waist to ground the look of the bold cross-stitching.


I have never done cross-stitching before, so this was definitely an experience! It took me hours upon hours to do! I ended up just 'tracing' and cross-stitching directly on top of one of the motifs from the fabric. My fabric design's motifs rotate, which doesn't lend itself to traditional cross-stitching, but that's OK - I love it anyway! Also, finally, with the photo shoot the next morning, I just didn't have another 3 hours or so to cross stitch the leaves, so instead I added some wool felt leaves that I cut out and stitched down. Overall, I love how this top turned out! I will definitely be wearing this one myself!


PROJECT IDEA #3:
For this next sewing pattern, I chose Simplicity #2192 by Cynthia Rowley and used my Hope Flourish, Citron print. Instead of creating a tie out of self fabric, I used some ribbon. I have to say, this is one of my favorite prints of this collection because of the colors and how they play out in the design. Love! This skirt is so unique...and super short! So I'd definitely recommend wearing it in the winter with some solid tights, ha ha! Or of you're a pattern genius then just make it a tad longer and it'll be just right.

PROJECT IDEA #4:
Wow! I was really proud of myself for sewing this one! I lined up the patterns on the top and the skirt just right and centered the motifs too. Whew! For this garment, I used Simplicity #2178 by Cynthia Rowley along with my fabrics Fancy That, Pink and Geometric Crochet, Citron. I used the Geometric Crochet, Citron fabric to make the waist, shoulder strap, and underside of the shoulder tie, contrast. I love mixing these prints in a subtle way!


Next week I'll share with you the sewing details for the remaining 4 garments. Stay tuned!

Oh, and if you're looking to purchase any of these fabrics, head on over to any of these online locations: 


LinkWithin

Related Posts with Thumbnails