Showing posts with label HOPE CHEST. Show all posts

Saturday, February 9, 2013

Just Added to the Shop!


I'm working away preparing for my Global Bazaar photo shoot tomorrow, which I'm SO excited about! In the meantime, I just had to let you know where you can find many of my gorgeous fabric accessories, stationery and scrapbook lovelies that my licensing partner Blend, the licensing division of Anna Griffin, Inc. has available to purchase on their online shop!

They just added tons of gorgeous Hope Chest items. If you're ready for some new stationery, or some fabric accessories, or ready to scrapbook 2012's memories, head on over and check out what they've got! They are the perfect items for gifts too!


I love them ALL...but if I HAD to pick some favorites I'd pick the Hope Chest wrap tote (these are AMAZING and GREAT to carry in your purse when you're shopping!), Hope Chest Duffel Bag, Hope Chest Tote Bag, Hope Chest Note Cards, Hope Chest Sticky Notes, Hope Chest 3D Art Stickers, and the Hope Chest 6x6 Cardstock Pad, and, and and!!! It's seriously hard to narrow it down.

What are your favorite items? I'd love to hear!

Friday, January 18, 2013

My Hope Chest Scrapbooking Line on HSN!

Hi Everyone! I've got three BIG announcements to share with you today! First off, my Hope Chest collection just debuted as a scrapbooking line at CHA with Blend!

Second, it will be selling on HSN Wednesday, January 23rd during the Today's Special at 11:00am (EST), particularly at 11:40am (EST)!
 
 {Image from Anna Griffin, Inc / Blend}

This is the perfect opportunity for you to get some new papers and embellishments to scrapbook your life and adventures - especially if you loved my Hope Chest fabric collection! In addition, there's more fabulous Hope Chest stationery items on their way too!

  {Image from Anna Griffin, Inc / Blend}

And Third, the main floral from my Hope Chest fabric collection, Hope Chest Floral, Olive, debuted at CHA also as a line of travel bags! Three pieces of great news, yes?!? Now I need to book a flight somewhere so I can use said beauties!

You can find some of my current Hope Chest stationery for sale on Anna Griffin's shop, under Blend.

  {Image from Anna Griffin, Inc / Blend}

My good friend, Diane Kappa, attended CHA (Craft & Hobby Association) and took some photo's of the gorgeous Blend / Anna Griffin booth that showcased my Hope Chest collection. Didn't they do an outstanding job? Check out the plethora of beautiful projects they created!! WOW!

 {My Hope Chest Scrapbooking Collection Display at the Blend / Anna Griffin Booth at CHA}

Didn't they do an amazing job with the display?

  {Close-up of My Hope Chest Scrapbooking Collection Display at the Blend / Anna Griffin Booth at CHA}

{Close-up of My Hope Chest Scrapbooking Collection Display at the Blend / Anna Griffin Booth at CHA}

Below are close-ups of some of the projects. I just think they did an AMAZING job. Everything they touch turns beautiful, seriously!

{Project Blend made using my New Hope Chest Scrapbooking Collection}

 {Project Blend made using my New Hope Chest Scrapbooking Collection}

{Projects Blend made using my New Hope Chest Scrapbooking Collection}

 {Project Blend made using my New Hope Chest Scrapbooking Collection}

 {Some of the new Hope Chest stationery coming out!}

I'm just so excited for all of these gorgeous products to hit the market so they can bring beauty and smiles to the women's lives who encounter them. If these make your heart happy, be sure to watch HSN this Wednesday, January 23rd so you can add them to your paper-crafting collection! Hope you enjoy! Thanks!!

Friday, October 19, 2012

Hope Chest Stationery & Desk Organization Products!


 {Hope Chest Single Greeting Card, Happy Birthday}

I'm so excited to share with you today the rest of the samples that came in the big box I mentioned in my last post! My Hope Chest collection that is currently in fabric, is now also in stationery and desk organization products! I absolutely LOVE seeing this collection in paper form - especially when it's all decked out in glitter!
 
 {L to R: Kite Note Paper Holder, Single Thank You Greeting Card, Note Pad Set of 3, Watering Can Sticky Note Folio, Single Birthday Greeting Card}

There's quite a few items in this collection from note pads to cards and sticky notes, file folders, note pads, etc.! The colors are beautiful and the products are nice and high quality. I took the products out of their packaging so I could get non-glaring pics, but what's even more special (to me) is that the product packaging dons my logo on the front, for branded product.

 {Portable Note Pad, File Folder set of 12 of 4 designs}

I'm just DYING over this super-cute scooter! It comes in a lovely clear box and includes a set of 10 note cards, 5 each of 2 designs. What a great hostess gift, yes?


Seeing my logo printed on the back like a license plate is like icing on the cake for me. SO CUTE! 


I've already started using them and scattering them throughout my office. This collection of licensed product is seriously a dream come true for me. For those of you who know me, I love to organize, and I spend a lot of time in my studio. So to have a chance to decorate my space with my own products is truly super-special.

{Inside of Watering Can Sticky Note Folio}


I hope you get a chance to get your hands on some of these pieces, either as gifts for the upcoming holiday season or for your own personal happiness! I'll try to keep you posted on where you can find these.

If you are a store interested in carrying any of these lovelies, from Hip Holiday and/or Hope Chest, please contact Blend, the licensing division of Anna Griffin, Inc. at 888.817.8170 to place an order.

Friday, September 14, 2012

Hope Chest Sewing Detials - Part 2

I'm back as promised, to give you the rest of the sewing details from the garments we made for my Hope Chest photo shoot! The following include some of my FAVORITES!

PROJECT IDEA #5
This pattern is Vogue #V1255 by Rebecca Taylor, and uses my fabric Cross Stitch Roses in Red. This is one of my favorite garments as I love the ruffles on the tunic, and think this print fits the look and feel of the garment really well! This tunic has ties on the side, but I belted it for the photo shoot to add more waist definition. Also, I quickly made a rustic looking necklace to add to the look by stringing an old key I bought from BHLDN on a leather necklace. Add some skinny jeans and boots, and you're set for fall!


PROJECT IDEA #6
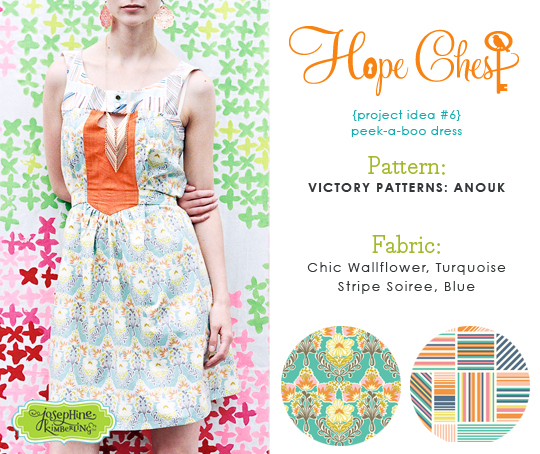
This dress was made from Victory Pattern's Anouk sewing pattern and use my Chic Wallflower, Turquoise and Stripe Soiree, Blue fabrics. I love this sewing pattern because you can make a top or a dress from it - both of which are super-cute and great additions to your closet! I also love the ties that allow a waistline to be added to the garments.

Since I was already using 2 different fabric patterns, I thought it would be too much to add a third, so I used an orange solid fabric for the center area. However, in the photo's with the Anouk sewing pattern, I love how they use a stripe here, and how it gets all 'chopped up' with the sewing details. It's nice that there are so many different ways you can create these garments.


PROJECT IDEA #7
This gorgeous dress is made from Simplicity #1802 by Cynthia Rowley, and uses my fabrics Hope Chest Floral, Blue and Flower Bed, Blue. I must say that is is my absolute favorite! It's so gorgeous in person it's not even funny. My sewing master Karin sewed this one up and used flat yellow piping to nicely contrast all the different sections. I decided to use the Hope Chest Floral, Blue in the center godets, instead of Flower Bed, Blue as I thought this would make the dress look more pulled together.

I made a fabric pouf out of Geometric Crochet, Blue and attached it to the dress to add a little more whimsy.


Project Idea #8
For this dress I used Simplicity #1939 by Cynthia Rowley and used 4 different fabrics to create a patchwork look. The fabrics I used are Hope Chest Floral in Olive for the main print, and also used it in the skirt patchwork along with Stripe Soiree in Olive, Chic Wallflower in Pink and Geometric Crochet in Citron. The patchwork isn't included in the sewing pattern, but I just sewed together 11" x 12" rectangles, 8 across and 3 high, with a 1/4" seam allowance. If I had to do it again, I would have made the rectangles 10 across, so they were a longer and skinnier rectangle and allowed for a 5/8" seam allowance.

To be honest, this dress was a tricky one to make look fabulous. Maybe it's my personal opinion or aesthetic, but when dresses are tight around the waist it can look way '80s which I don't love. I chose to make this dress though so I only have myself to blame! Thankfully this model looked terrific in it and was able to pull it off.

I do think the top portion of the dress is fantastic and would be great as a top tucked into skinny jeans. I had brought my sewing scissors to the photo shoot prepared to chop this dress up on site to turn it into a top just in case it didn't work as a dress. Also, to make the dress look more updated, we bubbled the front hem of the dress under for a high-low hem. In the end, I think it turned out pretty good!


Well, that brings me to the end of sharing with you the sewing patterns my friend Karin and I made for my Hope Chest photo shoot! I hope you enjoyed hearing a little bit more about the process. To see more garment details from this photo shoot and my previous ones, please visit my Inspiration page on my website.

Which garment out of the 8 is your favorite and why? I'd LOVE to hear!!

Friday, September 7, 2012

Hope Chest Sewing Details

Hi everyone! I thought I'd share with you some of the garment sewing details, from my Hope Chest photo shoot. Did you know that on my website's inspiration page, I include each of the garments we made for each collection, as well as which sewing pattern was used and which fabrics too? Since I've gotten some requests, I thought I'd go ahead and share more info with you in this blog post.

My goal when creating a fabric collection has always been to create patterns that can be worn. Having fashion in my background has caused this to be a passion of mine. When I set out to find sewing patterns to use for each photo shoot, I strive to find things that are fashionable and current with today's trends, as well as put my prints together in a way that would inspire women to feel beautiful and well put together when wearing them.

Here's some sewing details for you!

PROJECT IDEA #1
This pattern is from Victory Patterns, which is a new company I discovered while scouring Etsy. The name of this intermediate pattern is Ava, and it's just gorgeous! I used my Hope Flourish, Pink fabric along with some white netting for the neckline and sleeves, which I left with a raw edge. I made this one myself, but needed help from my expert sewing friend for the center sweetheart point connecting the mesh to the printed fabric top. I love how it turned out! Such a great top!
 

PROJECT IDEA #2:
I just love all the peplum styling details that are out now! They are super flattering and feminine, which I love. For this garment, I used Vogue #V8815 by Rebecca Taylor and my fabric Cross-Stitch roses. This sewing pattern is labeled 'very easy', however my sewing friend decided it would be best to line the top with matching white fabric, which I think made it look it's best. She positioned the fabric so that I could cross-stitch on top of the printed cross-stitch rose design, and I tied a hot pink double sided satin ribbon around the waist to ground the look of the bold cross-stitching.


I have never done cross-stitching before, so this was definitely an experience! It took me hours upon hours to do! I ended up just 'tracing' and cross-stitching directly on top of one of the motifs from the fabric. My fabric design's motifs rotate, which doesn't lend itself to traditional cross-stitching, but that's OK - I love it anyway! Also, finally, with the photo shoot the next morning, I just didn't have another 3 hours or so to cross stitch the leaves, so instead I added some wool felt leaves that I cut out and stitched down. Overall, I love how this top turned out! I will definitely be wearing this one myself!


PROJECT IDEA #3:
For this next sewing pattern, I chose Simplicity #2192 by Cynthia Rowley and used my Hope Flourish, Citron print. Instead of creating a tie out of self fabric, I used some ribbon. I have to say, this is one of my favorite prints of this collection because of the colors and how they play out in the design. Love! This skirt is so unique...and super short! So I'd definitely recommend wearing it in the winter with some solid tights, ha ha! Or of you're a pattern genius then just make it a tad longer and it'll be just right.

PROJECT IDEA #4:
Wow! I was really proud of myself for sewing this one! I lined up the patterns on the top and the skirt just right and centered the motifs too. Whew! For this garment, I used Simplicity #2178 by Cynthia Rowley along with my fabrics Fancy That, Pink and Geometric Crochet, Citron. I used the Geometric Crochet, Citron fabric to make the waist, shoulder strap, and underside of the shoulder tie, contrast. I love mixing these prints in a subtle way!


Next week I'll share with you the sewing details for the remaining 4 garments. Stay tuned!

Oh, and if you're looking to purchase any of these fabrics, head on over to any of these online locations: 


Tuesday, August 21, 2012

Hope Chest Photos!

{My favorite photo!}

Over the weekend, I've been posting the photo's from my Hope Chest photo shoot on my website, Facebook & Flickr. Have you had a chance to see them yet? I just got them back and am have been so excited to see my fabrics and all of our hard sewing work looking so glamorous.


I've been wanting to do a photo shoot at a carousel for a few years now, and this time I felt it really worked with the look of the fabrics. I was able to book out the carousel at the Woodland Park Zoo for a couple of hours before the zoo opened, which made it very hassle free to get the shots in that we wanted without a lot of extra people walking around. Also, this carousel was indoors, which was even more reassuring with our temperamental Seattle 'summer' weather.


My friend Karin and I put in a lot of work sewing up samples a few weeks leading up to the shoot. Karin and I worked at Nordstrom together and she's an amazing and award winning fashion designer, so she tackled the more difficult garments. This year I had 4 models with 2 outfit changes each for a total of 8 garments, which we sewed up in 2 weeks! It was pretty crazy! But each time something got finished, it felt really satisfying and it was fun to see the group and my vision start to come together.


Since I don't have my own line of sewing patterns (...yet?) I usually use the designer patterns from Simplicity and Vogue, (with Cynthia Rowley and Rebecca Taylor being my favorites), as well as scour Etsy to see if I can find some new indie designers with great designs. This year, I found Victory Patterns, and really loved a lot of their looks! Have you heard of them yet? I of course love the patterns of other fabric designers, but don't feel it's right to use them when showcasing my fabric collection.

{My Hope Chest fabric collection}


Photo shoots can be kinda hectic, but in a good way. I prepare all of the garments, jewelry, accessories, shoes, etc the night before, making sure everything is pressed and hung nicely. I usually ask the models to bring loads of shoes that we can select from, and I pour through my closet gathering many things from shoes to cami's to jewelry and hair accessories. And I map out a plan of which model will theoretically wear what. A few of the models I hadn't met before so I was crossing my fingers quite a bit, but thankfully everything worked out really well!


{All the girls looking gorgeous at the carousel!}
I had my Cross Stitch Roses backdrop that we set-up to get a few shots in front of. I love how bright and bold the backdrop turned out!! I'm definitely going to need to hang this up in my studio...probably for curtains! Along with the backdrop I laid out some props that went with my Hope Chest fabric theme, such as flowers, old keys and books (this was a great excuse for me to finally buy some of the Penguin Hardcover Classics with the beautifully patterned covers!).

{Love these books whose contents inspired my Hope Chest collection}
My awesome photographer Natalie, from Natalie G. Photography did wonders capturing the look of this shoot. Wouldn't you agree? This is the fourth photo shoot we've worked together on, and each year the photo's get better and better which I didn't even think was possible.


{Me and the girls}
Well, I hope you enjoy getting a little behind the scenes glimpse of my Hope Chest photo shoot! Any questions at all, just let me know and I'm happy to try to answer. I'll do another post explaining the garments I chose, soon. Thanks so much for taking a peek at my photos! What are your favorites? I hope they inspire you to use the collection for your next project!

PS - If you're a store interested in using my photo's to promote my Hope Chest fabric line, please contact me to let me know your needs. Thanks!

Friday, August 10, 2012

Hope Chest Photo Shoot- Creating my Cross Stitch Roses Backdrop


As I'm waiting for my Hope Chest photo's I thought I'd go ahead and share with you a little 'video' I made of me painting my Cross Stitch Roses backdrop for my photo shoot. I posted on Facebook and Twitter, a little sneak peak of the backdrop, and today is the big reveal!

This backdrop I painted is based off of my new fabric "Cross Stitch Roses" which is a part of my Hope Chest fabric collection with Blend Fabrics. The 'video' is made up of photos I took while I was creating the backdrop, so you can see it being built little by little. I've never made a video before, so I'm crossing my fingers that this works. Do let me know if it doesn't (and send any tips my way) and I'll try to fix it! ; )

{Close-up of my Cross Stitch Roses painted backdrop}

I'm also including some photos of the backdrop I painted here too. I absolutely love how vibrant the colors turned out, and I can't WAIT to see the photo's from my Hope Chest photo shoot to see how it turned out there.

{Photo of my Cross Stitch Roses backdrop from my upstairs window}

I had an absolute blast creating this. It took me about 5 hours to do. I first took my 'Cross Stitch Roses' artwork, and sized one of my motifs in Illustrator so I knew what size I needed to make my stamps. To create my stamps, I cut out 'x' shapes from foam and then glued them to pieces of foam core. I then used craft paint in a variety of colors to stamp the design out onto a huge 10' x 10' cutting of muslin fabric that I laid out on my back patio (of course with a painting backdrop underneath so it wouldn't go through onto the patio!). I also used a gardeners kneeling pad for my knees in order to keep the experience from being painful.

{Me with my creation}

I hope you enjoy seeing a little part of the process and getting a glimpse into a little bit of the behind the scenes prep for my Hope Chest photo shoot. I absolutely can't wait to see the photo's and share them with you too. Hopefully in the next 2 weeks I'll have them and be able to share. Thanks so much for watching my little video! 

Wednesday, August 8, 2012

Gorgeous Hope Chest Dresses Made by Amy Friend


I just HAD to share with you a sneak peak of these gorgeous dresses that the amazingly talented Amy Friend made using my Hope Chest fabrics! Aren't these beautiful?? She just posted about them on her blog During Quiet Time today and I had to run out and share them with all of you.

I absolutely adore these dresses and the prints she chose to mix together! SO adorable!!
For more photo's and to read Amy's post about her sewing process, the pattern she used, etc., head on over to Amy's blog: During Quiet Time

Don't you just LOVE??!!


Wednesday, June 27, 2012

Hope Chest Fabric Giveaway at Pink Castle Fabrics!


Hi Everyone! Pink Castle Fabrics is having a Hope Chest give away!! They are giving away 2 fat quarter bundles, each containing 10 prints, of Hope Chest! All you need to do is head on over to the Pink Castle Fabrics blog and leave a comment about which is your favorite print from the collection or sign-up on their Widget to Win it List. Good luck everyone!!

Speaking of Hope Chest, I'm SO excited for this collection to hit, and to see what you do with it. I'm hearing here and there that it's already available at some shops - so be on the look-out! AND, I don't know if you've had a chance to feel the fabric that Blend uses, but it is like butter - seriously. Smooth & delicious...I can't even feel the fabric warp and weft threads when I run my hand across the top - it's THAT kind of awesome. I think you will enjoy it!

I'm planning away for my upcoming inspirational Hope Chest photo shoot that I can't wait to share with you in July - stay tuned!

Monday, June 11, 2012

Surtex 2012: Year 2


 As I'm continuing with Surtex follow-up and chatting with companies about exciting possibilities, I thought I'd take a moment to fill you in on the show! First off, I must say that in trying to get my 3 suitcases under weight for airline baggage fees, I accidentally sent my camera with my husband to take home in his suitcase, so all I was left with was my iPhone for pictures. Sadness...

So, after flying in from Kansas City, MO on Friday night, it was time to wake up early and head to the Javits center for the last day of set-up. With 2 suitcases, a huge box, a tube full of banners and Starbucks in hand, we took any cab who would take us and headed to the Javits center to set-up my booth. My good friend Laura (Laura Parke // A girl who makes, from here) came to help me with the show and we were able to get everything set-up with a few hours to spare.


This year I was in a smashing new booth location #325 which was a 10'x10' booth, which means, more space to cover and decorate. With my booth design, I wanted to do something a little different and build upon what I did last year. I kept banners on the side walls, and also rented some shelves to put current and up and coming licensed products on. On my back wall, I created a layered and overlapping effect of my work, where I printed my artwork and photography showcasing my artwork over-sized onto large foam core boards and then created a few paper pinwheels to give the wall more dimension.

 {Hope Chest stationery & fabric}

{Hip Holiday stationery}

It was really fun to see all the products together on the shelves! I picked up my up and coming new stationery with Blend, the licensing division of Anna Griffin, Inc. which was absolutely delightful to see! My Hope Chest fabric collection which is coming out in July is also made into this beautiful high-end stationery complete with glitter, foil, die cuts...the works! In addition to Hope Chest stationery items is my Hip Holiday collection, which will also be coming out in my first ever Holiday fabric collection! I just LOVE this holiday collection and all the items it comes in!

{My awesome Wellspring licensed products!}

Also added to the shelves are a handful of the gorgeous metal products from Wellspring! I absolutely love these pieces and the colors they are in! My husband spray painted these 3-tier holders to take them from drab to fab.
 
 {Some of my NEW Stationery product coming out! Stay tuned...}


My new iPop magnets were sprinkled about, holding up the stationery on the magnet boards. There's a lot of new designs that just came out, that I'm excited to show you in the near future!

{Hope Chest display outside of the Anna Griffin booth at the National Stationery Show}

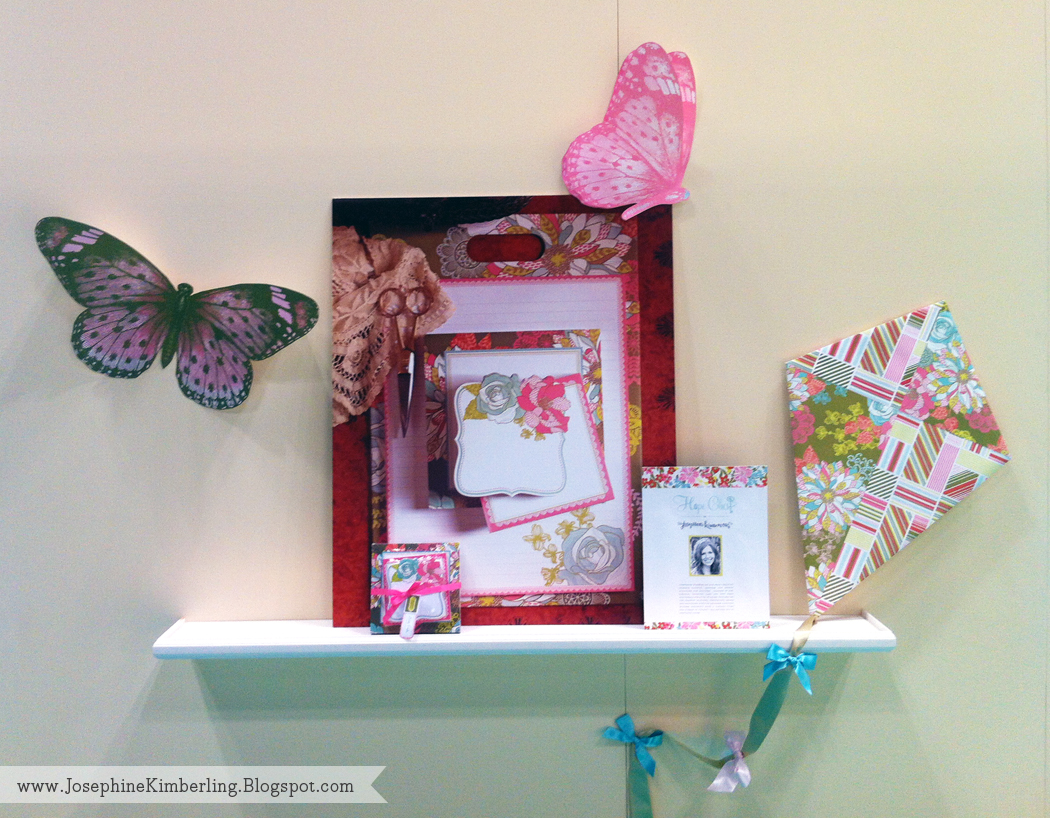
Another little treat for me was seeing this Hope Chest display with my designer bio on the outside wall of the Anna Griffin booth, to promote Blend's stationery items. What a treat! I love the butterflies and the kite they made! 


Ok, back to the show...Laura and I got in early opening morning (thank goodness!) and found my whole back wall to be on the floor! Gasp! Just when we thought we'd have time to eat our breakfast leisurely, we found ourselves in crisis mode repairing everything as fast as we could before the show opened. It was pretty stressful, but we were focused, amazingly calm, and just tackled it. I was completely overwhelmed by the kindness of so many of the other artists exhibiting who came over to see if they could help us, and bring us anything we needed. 
 
My booth was across from Kate Spain and she and her husband completely saved my life! They brought over tons of 3M Command Strips for me to use to patch my wall back together. Which is a huge lifesaver because I had taken almost all of my adhesives back to the hotel the night before and didn't have enough to use for a whole wall. Note to self: Bring LOTS of extra 3M Command Strips and keep them throughout the show. OH, and another Note to Self: NEVER buy non-3M duct tape! In my mad-dash through Lowe's I grabbed duct tape not even thinking that there were other brands or qualities out there. Now I know! Non-3M duct tape is not very sticky and with the overnight humidity in the Javits center, it was just a disaster.


After the stressful morning of the first day, things went really well. I had a blast seeing current clients in person after months of communicating over the phone and e-mail, as well as meeting new clients with fun, new possibilities! I'm still working on follow-up and communicating with new companies and will be able to gauge the awesomeness of the show more after a few more months. Overall, I had a blast and am really excited for the potential.

I roomed with 3 other girls, my friend Laura and Morgan & Carrie from Ampersand Design Studio. I heart every one of these girls! We had a blast going to fab restaurants and hitting up shops after the show ended each night. More about that in the next blog post...stay tuned!
LinkWithin

Related Posts with Thumbnails