Showing posts with label MODERN FABRIC DESIGNER. Show all posts

Friday, March 1, 2013

Moyo Digital Magazine Feature - Fashion & Fabric


Issue 3 of Moyo magazine is out, which includes an interview with me talking about 'Fashion and Fabric'. In this interview I answer questions like 'How to submit your work to a fabric company', explain the differences between designing for fashion and bolt fabric, and I walk you through my thoughts and process for designing my Hope Chest fabric line.

Also included in this issue is Amy Butler who talks about the business of design, a fun designer diary from Jessica Swift, and other great pattern news and information that I'm sure you'll love. If you are a textile or surface pattern designer, I encourage you to read this issue of Moyo which is all about fabric!

If you haven't heard of Moyo magazine yet, ‘MOYO’ (pronounced mo-yor) is from the Japanese for ‘pattern’, and was started by Rachael Taylor and Beth Nicholls.

Please feel free to share this resource on your blog, in your newsletters etc and tell all your friends about it. Visit the website and scroll down for details of how to share it. MOYO is free and they want to share the wonderful world of surface pattern design with as many people as possible! 


If you read my interview and have any further questions about fashion and fabric, please post them in the comments section and I'd be happy to answer them!

Friday, September 14, 2012

Hope Chest Sewing Detials - Part 2

I'm back as promised, to give you the rest of the sewing details from the garments we made for my Hope Chest photo shoot! The following include some of my FAVORITES!

PROJECT IDEA #5
This pattern is Vogue #V1255 by Rebecca Taylor, and uses my fabric Cross Stitch Roses in Red. This is one of my favorite garments as I love the ruffles on the tunic, and think this print fits the look and feel of the garment really well! This tunic has ties on the side, but I belted it for the photo shoot to add more waist definition. Also, I quickly made a rustic looking necklace to add to the look by stringing an old key I bought from BHLDN on a leather necklace. Add some skinny jeans and boots, and you're set for fall!


PROJECT IDEA #6
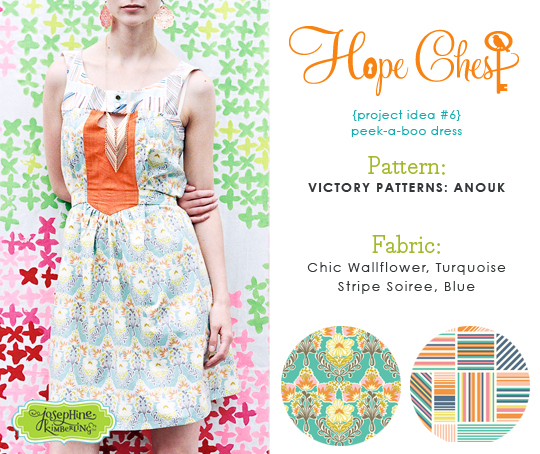
This dress was made from Victory Pattern's Anouk sewing pattern and use my Chic Wallflower, Turquoise and Stripe Soiree, Blue fabrics. I love this sewing pattern because you can make a top or a dress from it - both of which are super-cute and great additions to your closet! I also love the ties that allow a waistline to be added to the garments.

Since I was already using 2 different fabric patterns, I thought it would be too much to add a third, so I used an orange solid fabric for the center area. However, in the photo's with the Anouk sewing pattern, I love how they use a stripe here, and how it gets all 'chopped up' with the sewing details. It's nice that there are so many different ways you can create these garments.


PROJECT IDEA #7
This gorgeous dress is made from Simplicity #1802 by Cynthia Rowley, and uses my fabrics Hope Chest Floral, Blue and Flower Bed, Blue. I must say that is is my absolute favorite! It's so gorgeous in person it's not even funny. My sewing master Karin sewed this one up and used flat yellow piping to nicely contrast all the different sections. I decided to use the Hope Chest Floral, Blue in the center godets, instead of Flower Bed, Blue as I thought this would make the dress look more pulled together.

I made a fabric pouf out of Geometric Crochet, Blue and attached it to the dress to add a little more whimsy.


Project Idea #8
For this dress I used Simplicity #1939 by Cynthia Rowley and used 4 different fabrics to create a patchwork look. The fabrics I used are Hope Chest Floral in Olive for the main print, and also used it in the skirt patchwork along with Stripe Soiree in Olive, Chic Wallflower in Pink and Geometric Crochet in Citron. The patchwork isn't included in the sewing pattern, but I just sewed together 11" x 12" rectangles, 8 across and 3 high, with a 1/4" seam allowance. If I had to do it again, I would have made the rectangles 10 across, so they were a longer and skinnier rectangle and allowed for a 5/8" seam allowance.

To be honest, this dress was a tricky one to make look fabulous. Maybe it's my personal opinion or aesthetic, but when dresses are tight around the waist it can look way '80s which I don't love. I chose to make this dress though so I only have myself to blame! Thankfully this model looked terrific in it and was able to pull it off.

I do think the top portion of the dress is fantastic and would be great as a top tucked into skinny jeans. I had brought my sewing scissors to the photo shoot prepared to chop this dress up on site to turn it into a top just in case it didn't work as a dress. Also, to make the dress look more updated, we bubbled the front hem of the dress under for a high-low hem. In the end, I think it turned out pretty good!


Well, that brings me to the end of sharing with you the sewing patterns my friend Karin and I made for my Hope Chest photo shoot! I hope you enjoyed hearing a little bit more about the process. To see more garment details from this photo shoot and my previous ones, please visit my Inspiration page on my website.

Which garment out of the 8 is your favorite and why? I'd LOVE to hear!!

Friday, September 7, 2012

Hope Chest Sewing Details

Hi everyone! I thought I'd share with you some of the garment sewing details, from my Hope Chest photo shoot. Did you know that on my website's inspiration page, I include each of the garments we made for each collection, as well as which sewing pattern was used and which fabrics too? Since I've gotten some requests, I thought I'd go ahead and share more info with you in this blog post.

My goal when creating a fabric collection has always been to create patterns that can be worn. Having fashion in my background has caused this to be a passion of mine. When I set out to find sewing patterns to use for each photo shoot, I strive to find things that are fashionable and current with today's trends, as well as put my prints together in a way that would inspire women to feel beautiful and well put together when wearing them.

Here's some sewing details for you!

PROJECT IDEA #1
This pattern is from Victory Patterns, which is a new company I discovered while scouring Etsy. The name of this intermediate pattern is Ava, and it's just gorgeous! I used my Hope Flourish, Pink fabric along with some white netting for the neckline and sleeves, which I left with a raw edge. I made this one myself, but needed help from my expert sewing friend for the center sweetheart point connecting the mesh to the printed fabric top. I love how it turned out! Such a great top!
 

PROJECT IDEA #2:
I just love all the peplum styling details that are out now! They are super flattering and feminine, which I love. For this garment, I used Vogue #V8815 by Rebecca Taylor and my fabric Cross-Stitch roses. This sewing pattern is labeled 'very easy', however my sewing friend decided it would be best to line the top with matching white fabric, which I think made it look it's best. She positioned the fabric so that I could cross-stitch on top of the printed cross-stitch rose design, and I tied a hot pink double sided satin ribbon around the waist to ground the look of the bold cross-stitching.


I have never done cross-stitching before, so this was definitely an experience! It took me hours upon hours to do! I ended up just 'tracing' and cross-stitching directly on top of one of the motifs from the fabric. My fabric design's motifs rotate, which doesn't lend itself to traditional cross-stitching, but that's OK - I love it anyway! Also, finally, with the photo shoot the next morning, I just didn't have another 3 hours or so to cross stitch the leaves, so instead I added some wool felt leaves that I cut out and stitched down. Overall, I love how this top turned out! I will definitely be wearing this one myself!


PROJECT IDEA #3:
For this next sewing pattern, I chose Simplicity #2192 by Cynthia Rowley and used my Hope Flourish, Citron print. Instead of creating a tie out of self fabric, I used some ribbon. I have to say, this is one of my favorite prints of this collection because of the colors and how they play out in the design. Love! This skirt is so unique...and super short! So I'd definitely recommend wearing it in the winter with some solid tights, ha ha! Or of you're a pattern genius then just make it a tad longer and it'll be just right.

PROJECT IDEA #4:
Wow! I was really proud of myself for sewing this one! I lined up the patterns on the top and the skirt just right and centered the motifs too. Whew! For this garment, I used Simplicity #2178 by Cynthia Rowley along with my fabrics Fancy That, Pink and Geometric Crochet, Citron. I used the Geometric Crochet, Citron fabric to make the waist, shoulder strap, and underside of the shoulder tie, contrast. I love mixing these prints in a subtle way!


Next week I'll share with you the sewing details for the remaining 4 garments. Stay tuned!

Oh, and if you're looking to purchase any of these fabrics, head on over to any of these online locations: 


Tuesday, August 21, 2012

Hope Chest Photos!

{My favorite photo!}

Over the weekend, I've been posting the photo's from my Hope Chest photo shoot on my website, Facebook & Flickr. Have you had a chance to see them yet? I just got them back and am have been so excited to see my fabrics and all of our hard sewing work looking so glamorous.


I've been wanting to do a photo shoot at a carousel for a few years now, and this time I felt it really worked with the look of the fabrics. I was able to book out the carousel at the Woodland Park Zoo for a couple of hours before the zoo opened, which made it very hassle free to get the shots in that we wanted without a lot of extra people walking around. Also, this carousel was indoors, which was even more reassuring with our temperamental Seattle 'summer' weather.


My friend Karin and I put in a lot of work sewing up samples a few weeks leading up to the shoot. Karin and I worked at Nordstrom together and she's an amazing and award winning fashion designer, so she tackled the more difficult garments. This year I had 4 models with 2 outfit changes each for a total of 8 garments, which we sewed up in 2 weeks! It was pretty crazy! But each time something got finished, it felt really satisfying and it was fun to see the group and my vision start to come together.


Since I don't have my own line of sewing patterns (...yet?) I usually use the designer patterns from Simplicity and Vogue, (with Cynthia Rowley and Rebecca Taylor being my favorites), as well as scour Etsy to see if I can find some new indie designers with great designs. This year, I found Victory Patterns, and really loved a lot of their looks! Have you heard of them yet? I of course love the patterns of other fabric designers, but don't feel it's right to use them when showcasing my fabric collection.

{My Hope Chest fabric collection}


Photo shoots can be kinda hectic, but in a good way. I prepare all of the garments, jewelry, accessories, shoes, etc the night before, making sure everything is pressed and hung nicely. I usually ask the models to bring loads of shoes that we can select from, and I pour through my closet gathering many things from shoes to cami's to jewelry and hair accessories. And I map out a plan of which model will theoretically wear what. A few of the models I hadn't met before so I was crossing my fingers quite a bit, but thankfully everything worked out really well!


{All the girls looking gorgeous at the carousel!}
I had my Cross Stitch Roses backdrop that we set-up to get a few shots in front of. I love how bright and bold the backdrop turned out!! I'm definitely going to need to hang this up in my studio...probably for curtains! Along with the backdrop I laid out some props that went with my Hope Chest fabric theme, such as flowers, old keys and books (this was a great excuse for me to finally buy some of the Penguin Hardcover Classics with the beautifully patterned covers!).

{Love these books whose contents inspired my Hope Chest collection}
My awesome photographer Natalie, from Natalie G. Photography did wonders capturing the look of this shoot. Wouldn't you agree? This is the fourth photo shoot we've worked together on, and each year the photo's get better and better which I didn't even think was possible.


{Me and the girls}
Well, I hope you enjoy getting a little behind the scenes glimpse of my Hope Chest photo shoot! Any questions at all, just let me know and I'm happy to try to answer. I'll do another post explaining the garments I chose, soon. Thanks so much for taking a peek at my photos! What are your favorites? I hope they inspire you to use the collection for your next project!

PS - If you're a store interested in using my photo's to promote my Hope Chest fabric line, please contact me to let me know your needs. Thanks!

Wednesday, August 8, 2012

Gorgeous Hope Chest Dresses Made by Amy Friend


I just HAD to share with you a sneak peak of these gorgeous dresses that the amazingly talented Amy Friend made using my Hope Chest fabrics! Aren't these beautiful?? She just posted about them on her blog During Quiet Time today and I had to run out and share them with all of you.

I absolutely adore these dresses and the prints she chose to mix together! SO adorable!!
For more photo's and to read Amy's post about her sewing process, the pattern she used, etc., head on over to Amy's blog: During Quiet Time

Don't you just LOVE??!!


Friday, July 27, 2012

Sew It All TV & Magazine Feature


Last fall I got an invitation from Ellen March to be on the show Sew it All TV to talk about my fabric designing process as well as to introduce a sewing project. The sewing project I'm sharing is a cute sketchbook cover with a ribbon bookmark and full of pockets. In addition to the TV show 'Material World', Episode 302 that is currently a part of their new season 3 which is currently airing, the project is also featured in the latest issue of Sew It All magazine, out on newsstands now!

{Look for this magazine cover on newsstands!}

You can find the pattern and instructions to my fabulous sketchbook cover here.
Also, you can find the actual 7"x10" sketchbook I used here.
These are my new favorite sketchbooks as I love the thick paper and the tooth. I bought a huge 11"x14" one that I just LOOoove! But, yes, they do need to be prettied up.

{Sketchbook featured in the magazine and TV episode}
 
 
{Other sketchbook ideas...} 

The public television series Sew It All is hosted by Ellen March and is a co-production with Iowa Public Television. Each episode teaches a fundamental sewing technique and a quick-and-easy project that utilizes the technique. Whether you’re a beginner, intermediate or advanced sewist, you’ll love the casual, fun vibe and no-fear approach that Sew it All offers. For a listing of showtimes and airdates, please contact your local PBS station—and request that they carry the show (if they don’t already).

Soooo, let's back-up a little bit, and I'll give you a little behind-the-scenes glimpse into my life. When I received the invitation to appear on TV, my first response was...terror - TV? Um, no thanks! But I decided to sleep on it and see how I felt in the morning (highly recommend!). Something bubbled up that I've always allowed to guide me and that is to "do something that scares you" because I believe it's one of the key ways you invite growth into your life, and don't allow your fears to control you. And who wants to live a still, non-progressive life full of fear? So I welcomed the invitation even though I was scared out of my wits, all for the sake of growing.

I had an absolute blast doing it! Ellen is so natural at it, warm and inviting. The team there was absolutely fantastic. I just got a chance to watch the episode (Series 3, Episode 302) which was fun to see. You can also purchase previous seasons 1 & 2 on DVD here.

Let me know if you get a chance to watch the season and the episode!

Tuesday, June 5, 2012

Spring Quilt Market 2012: Kansas City, Missouri

{My Hope Chest section at the Anna Griffin & Blend Fabrics booth}

Wow! What a whirlwind of awesomeness I just came out of! Quilt Market in Kansas City, MO and then straight to NYC for Surtex! After a few days of sleeping in, unpacking suitcases and boxes (and a little weekend getaway at a local resort thanks to my husband), I am finally fully functioning. It's amazing how 2 weeks out of my element while doing things I really enjoy can be so exhausting.


This was the first time I'd ever attended Quilt Market. I've wanted to go for such a long time! I was extra excited to attend this year because I got to meet the fabulous Blend Fabrics team in person as well as because I spent 2 years at Hallmark Cards in Kansas City and have a lot of friends still there that I had the chance to catch-up with. So I added on a few days, brought my husband with me, and we made a little vacation out of it too! = BEST decision ever!

 {My Hope Chest section at the Anna Griffin & Blend Fabrics booth}

The Anna Griffin & Blend Fabrics booth was absolutely spectacular. The large columns, lights, clear designer chairs and soft color of the walls and carpet just made this booth glow! Completely gorgeous!

 {Esperer quilt in Hope Chest, Heirloom Combo by Metropolitan Quilt}

In addition to seeing my Hope Chest fabric collection draped across a ladder that stretched up the walls, I also got to see it made up in 2 fabulous and beautiful large quilts! Each quilt is made up of one colorway of Hope Chest and both of the quilts were made by Metropolitan Quilt. This 'Esperer' Quilt is made up in my 'Heirloom' color combo. I just love the hits of the rusty red in my Cross Stitch Roses fabric!

 {'Stripe Soiree' quilt in Hope Chest, Bliss Combo by Metropolitan Quilt}

The next quilt is called 'Stripe Soiree' which is based off my 'Stripe Soiree' fabric and created in my 'Bliss' color combo. You can download this quilt pattern for free on the Blend Fabrics website! Didn't Metropolitan Quilt do an amazing job!! WOW! LOVE!!

 {Anna Griffin and I at the Anna Griffin & Blend Fabrics booth at Quilt Market}


Thanks so much for all of you who stopped by to say 'hello' and to check out the beautiful fabric collections at Anna Griffin and Blend Fabrics! I had such a great time meeting each and every one of you as well as the fabulous team at Blend! And I must say I was extra-super excited to meet the fabulous Anna Griffin herself. What an amazing woman!


Next up, I'll be sewing away to prepare for my Hope Chest photo shoot! I'm SO EXCITED for this one and can't wait to have it and share it with you! There's some fun things cooking up...stay tuned!


Friday, January 27, 2012

Book Review (& Press!) - A Field Guide to Fabric Design


I just received my copy of 'A Field Guide to Fabric Design' by Kimberly Kight of the fabulous fabric blog True Up, in the mail yesterday, and let me just say it - I LOVE it! Kim did such an amazing job with this book and if you are someone interested in creating your own fabric collection, learning from current fabric designers or wanting to learn how to put your artwork into repeat, either by hand or in the computer - this is the book for you. She also included Designer Roundtables where she holds Q and A with a variety of fabric designers, which I am so excited to be a part of.


I'm super-sure you've heard of Kim and her True Up blog - but to let you know a little bit about Kim, she started her blog in 2008 because of her obsession with fabric, and over that time has used that passion to teach herself fabric design, and now teaches on the subject where she lives in Austin, Texas.

A Field Guide to Fabric Design walks you through how to design, print and sell your own fabric and covers both traditional and digital techniques. I love that she teaches one of my favorite Illustrator tools, the 'Recolor Artwork' tool which allows you to create colorways easily of your designs. As well as the Photoshop 'Offset Filter' which helps you create seamless repeats.


The book is broken down into three sections with multiple chapters within each section, which are:

Section One: Design and Color
Fabric Design Fundamentals
Step-by-Step Design - Covers creating repeats by hand and by computer
Know Your Color - Creating color palettes and colorways
Colorways and Collections - Creating collections of patterns for the fabric industry and balancing color throughout

Section Two: Printing
Know Your Surface: Fabric Basics
Step-by-Step Hand Printing
Digital Printing

Section Three: The World of Fabric Design
Designing for Fun and Profit

There's also a wide variety of page previews of the insides of this book on Amazon, if you'd like to see more. Overall, if you haven't added this book to your library, I would highly recommend it! Kim did such a great and thorough job at including everything you need to know about being a designer in the industry and taking a shot at it yourself. (And by the way - this book is ranked #2 on Amazon's Textile and Costumes Bestseller List - for good reason! Way to go Kim!)

Thursday, November 3, 2011

Book Review (& Press!): Mastering the Art of Fabric Printing and Design


The highly anticipated book by fabric designer Laurie Wisbrun 'Mastering the Art of Fabric Printing and Design' is Laurie's first book and is an inspirational and practical guide that walks readers through the entire fabric design and printing process. Laurie finds the offbeat beauty in everyday objects and patterns, and translates them into unique surface and textile designs. Be sure to head over to her website to check out her fun & bold work!

This book is currently available in the UK and will be arriving in the US in February! I happily received my copy, read through it immediately, and decided I MUST share the contents with you.

This book not only contains techniques, tutorials and inspiration, but it also contains interviews of some fabulous designers out in the field now, which are very fun to read, and sprinkled throughout the book. And I must let you know that I am thankful to have been included in the designer interviews for this book! {Thanks Laurie!!} I had a great time answering her awesome questions and am super excited to be included in Chapter 2 'Sourcing Inspiration'.


To start things off, I must say that this book is very relevant to the now. It seems like every corner I turn I come across someone who has questions about creating a fabric collection, how to put artwork into repeat, or how to make a profession out of being a surface designer. This book is a great resource geared toward the beginning and budding designer, to assist in guiding you through the exciting field of fabric design and production.


Here's the chapter breakdowns for you:

CHAPTER 1: Designing for Fabric
Walks you through the different types of 'motifs' (such as florals, geometrics and ethnic designs), types of repeats, and working with color.

CHAPTER 2: Sourcing Inspiration
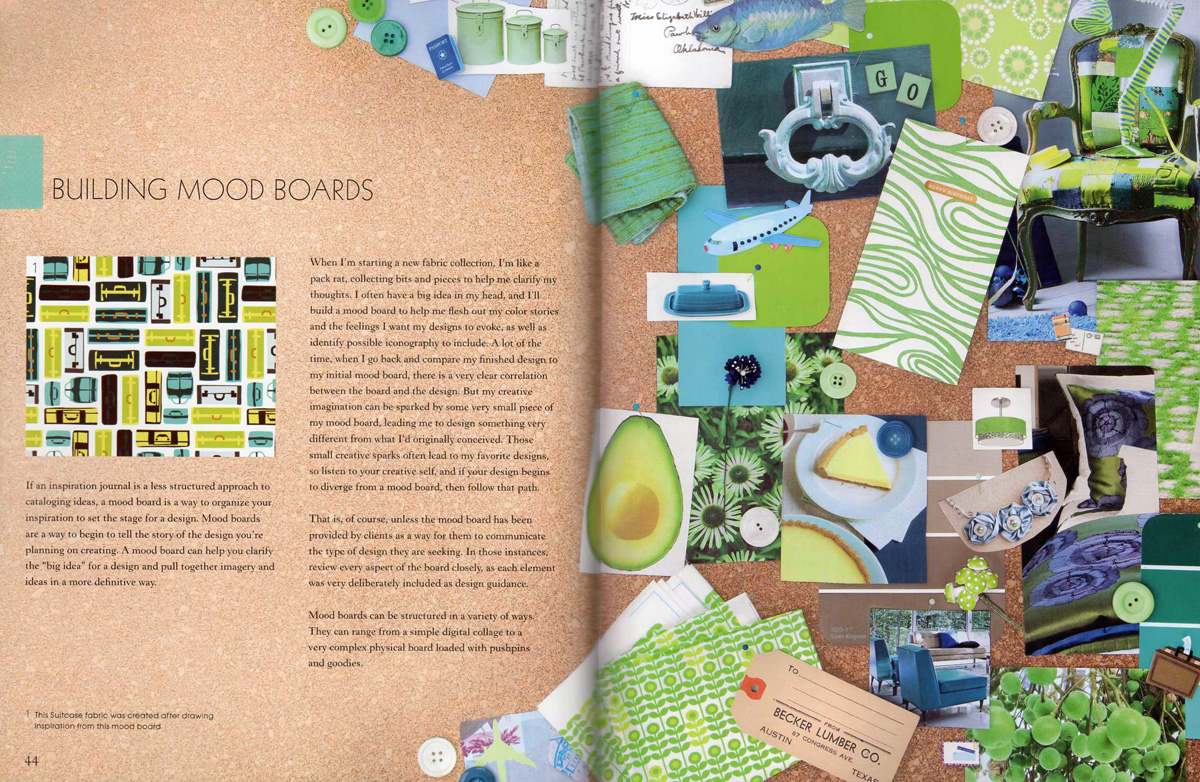
From researching trends, to keeping inspiration journals and creating mood boards, this chapter will guide you though ways to keep yourself inspired.

CHAPTER 3: Designing Patterns
Contains tutorials on how to build 3 different types of repeats in Adobe Illustrator and Adobe Photoshop CS4, how to create a digital color palette, and how to create repeats by hand.

CHAPTER 4: Understanding Fabric, Inks and Dyes
Reviews different fabric treatments, textile dyes/inks/paints and resist dyeing.

CHAPTER 5: Hand Printing
Walks you through block printing basics and how to create repeats using block printing. Also includes stencil printing & the screenprinting process.

CHAPTER 6: Digital Printing
Working with a digital printing service, including adjusting color and touching up images.

CHAPTER 7: Going Professional
Chocked-full of designer interviews, and includes lists of examples of courses of study from universities that will put you on the road to this industry, as well as a list of full-time career options. Another highlight is how to approach fabric manufacturers and how to develop collections for licensees to developing a marketing plan and tidbits on trade shows. 


I would highly recommend this book for beginning designers as it is a fabulous resource tool full of important information that will help you on your way to learning more about fabric designing! Be sure to get your hands on a copy!

Tuesday, July 5, 2011

Just Dandy Interview & Give Away at Fat Quarterly Blog!

{Blog header I designed for Fat Quarterly Blog for the spirit of the interview & give away}

Head on over to the Fat Quarterly Blog to read my latest interview and to enter to win Just Dandy fabric bundles! Robert Kaufman is giving away Just Dandy bundles to a few lucky readers. All you have to do head over to the Fat Quarterly Blog and leave a comment, letting them know which is your favorite print from my Just Dandy collection. They will randomly select a winner some time next week.

If you aren't familiar with Fat Quarterly, it is a new e-magazine written by modern sewists for modern sewists. Fat Quarterly is released 4 times per year, and each issue features a vibrant mix of content by some of today's most exciting sewists. Fat Quarterly has a blog, an e-magazine and a newsletter. Pretty fun stuff, don't you think?

With the interview, I was asked to design their blog header, which was a lot of fun! Head over to learn more about my design process & to enter to win!

Good luck everyone!!!

Sunday, April 24, 2011

Just Dandy! Fabric Give-Away!


Hi Everyone! Just wanted to give you a heads-up about a chance to win some free fabric!!

Head on over to QuiltingDaily.com to enter to win a fat quarter bundle of my 'Just Dandy!' fabric line! Leave a comment there about how you mix and match bold fabrics for your chance to win! A winner will be chosen on Tuesday, April 26th.

A huge thanks to Lindsey Murray of QuiltingDaily.com for interviewing me, and to Robert Kaufman for their generous give-away.

**Please note I am not hosting the give-away on my blog, I'm just letting you know, so please head over to QuiltingDaily.com to enter to win!

Good luck everyone!!

Friday, April 1, 2011

Just Dandy! Fabric Sneak Peak

{Photography by Natalie G Photography}

I just got the pictures back about an hour ago from my Just Dandy! fabric collection photo shoot, and wanted to share a little sneak peak with you! This time I had kiddo's in my photo shoot which was wonderful as they were so joyous and full of energy! The photo above was the last picture of the shoot of me with the girls. We had so much fun!


My Just Dandy! fabric collection is a celebration of modern prints with vintage nostalgia that bring about whimsy and joy.


{Robert Kaufman has just posted my Just Dandy! fabric collection on their website, which is ready for you to see!} **Correction** The collection is not ready to see yet - oops! Thanks for your feedback! I'll keep you posted when it's up and ready!!

What's really exciting about this collection is that it is printed on a lighter weight 100% cotton fabric, which is great for clothing.

I'll be sure to post more pictures from my fun photo shoot on my website soon, and will do another blog post that will be much more in-depth. Please stay tuned!!

And I feel compelled to say "thanks" to everyone out there who has been using my fabrics and sending me pictures! You are such a support and encouragement to me! I hope my new collection is a fun one for you to work with and inspires you to dream up new projects!


Sunday, January 2, 2011

Working with Pantone Color Standards - for Fabric

With some new projects that have come my way, and new clients I've been working with, I finally had a huge need to have my own Pantone library so I could communicate color choices across the globe by digital means.

It was one of those moments where I was kinda surprised that I've been doing my own thing for a few years now, and haven't needed to communicate color yet. I've been a professional in the fashion industry for over 10 years, and working with color standards is one of the tools that you just have to have - right up there with having art supplies to create with. So, after doing some online shopping around to find a good price, I finally bit the bullet and purchased a variety of Pantone books that would fit the multiple needs and product categories that I work with.

{Picture of the Pantone Fashion + Home Cotton Selector Books}
I ended up purchasing the Pantone Fashion + Home Cotton Selector for all my fabric/fashion/textile needs because I wanted to be able to remove the colors from the book and place them next to other colors to see how they work together, when choosing colors for my artwork. I would much rather have purchased the Pantone Fasion + Home Cotton Swatch Files books, but that price tag was waaay too high! However, having the ability to work with color chips individually would have been quite dreamy, as this is what I'm used to in my professional environment. I also purchased a variety of Pantone books for paper as well, which include the Solid Chips and the Process Chips.

{Picture of the inside of the Pantone Fashion + Home Cotton Selector Books}

EXPLANATION OF PANTONE & COLOR STANDARDS
For those of you who aren't familiar with color standards or Pantone, let me give you introduction to what it is, and the importance of working with color standards to communicate color accurately. First off, a 'color standard' is a standard language for accurate color communication, from designer to manufacturer to retailer to customer, across a variety of industries. Since color is seen and interpreted differently by individuals, a color standard allows for us all to communicate the same.

There are two major companies out there who produce color standards for the fashion industry. They are Pantone and Scotdic. Pantone is more globally known and used because they also produce color standards for the graphic design industry, web, plastics, etc., and because of this have become the leader in the industry. For this blog post, I'm just going to focus on Pantone.

When using a color standard, and communicating color to a manufacturer, it is important to use the correct type of color standard for the type of product you are working with because the same color will look different when printed on paper vs printed on fabric, etc. This will also allow for the color you are expecting it to look like, to actually be able to be achieved.

CHOOSING THE CORRECT PANTONE STANDARDS
Here are some examples for you regarding working with and choosing the correct Pantone book. Example 1) If you are working with textiles, you would use the Pantone Fashion + Home standards, as the standards are made out of cotton, therefore the colors are achievable on fabric. Example 2) If you are in the graphic design industry, and are printing out a 2 color brochure, you would use the Pantone Solid Chips book, and then choose between the coated and uncoated books, based on the paper your brochure will be printed on. This is because 2 colors are cheaper to print than '4 color process', which uses a mixture of the 4 ink colors 'CMYK' or Cyan, Magenta, Yellow and Black. Example 3) If you are in the graphic design industry and working on a menu that has full color photo's of the entree's as well as multiple colored graphics, then you would use the Pantone CMYK coated or uncoated books for process color, so you could achieve multiple colors using 4 color process printing.

PANTONE'S DIGITAL COLOR LIBRARIES
Also, within digital programs such as Adobe Illustrator & Photoshop, you can open up digital Pantone libraries and work with colors that way, so that the colors used in your document are able to be used as a communication tool to your manufacturer. This is how the graphic design industry works. It's a bit different in the fashion industry, and I won't go into that now, however Pantone did come out with a digital color library for Fashion + Home colors, which I did purchase but haven't used yet. I'm curious to explore this further and see how widely this becomes used in the fashion industry in the future.

Ok, are you still with me? Hopefully this is helpful and not too much information that is causing your head to spin!

WORKFLOW: FROM DESIGN TO PRODUCTION
I also wanted to chat about workflow from design to production, when working with color standards, and when working directly with a manufacturer. Let's say that you design a pattern that is going to be printed on fabric. You pull out your Pantone Fashion + Home color standard book, and begin choosing the colors you want to be used by the manufacturer in your design. You communicate to your manufacturer that the light pink in the artwork is to be Pantone 14-1419 TCX. (Always include the latter part of the number 'TCX' to make sure you and the manuf. are using the same version of Pantone books!).

If the manufacturer doesn't have the Pantone TCX standards on their end, and they only have TC (older version of Pantone colors, before TCX came out), then you have two choices. Communicate colors to them in the TC version, or purchase individual Pantone TCX standards or 'SMART color swatch cards' for each color you want to use in your print and send them to the manufacturer for them to use. If you do this, be sure to cut them in half first - one half for you to keep and the other half you send to your manufacturer, so you have a record of the color.

On a side note - another avenue to all of this is the light source or 'color evaluation tool' - you want to be sure that the light source you are reviewing color in is the same light source that your manufacturer is reviewing color in. This way your communication is very accurate. If you are looking at color under a very yellow bulb from your desk task lamp, and they are looking at color under a fluorescent light source, then the color will look very different, and you will not be communicating about color the same.

Next, the manufacturer will begin creating a strike-off, which is your artwork printed on fabric, and will send off for you to review. When you receive this, you pull out your individual Pantone standards, and compare them to the strike-off under the agreed upon light source, and make your color comments. If the color is off, then you make your color comments to your manufacturer on what they need to do to correct the color. For example, 'reduce red'. Once all of your colors have been commented on, your manufacturer will then make those color adjustments and send you another strike-off. Each strike-off is usually a 2-3 week turn-around. So, if colors aren't coming out as accurate as you would like, and your deadline for production is fast approaching, you will need to either accept a strike-off for what it is or drop it from your line if you think the coloring will not sell.

Once all your colors have been approved, your manufacturer will then begin printing 'bulk' or production yardage of your artwork!

EXPECTATIONS
If you are working with a fabric company, many times they are handling this workflow internally. Sometimes you can opt in to be a part of the approval process, in which some of this would fall onto your plate. If that is the case, then it's very important to be sure to be on top of communicating on the strike-offs ASAP so you can be sure to be a part of hitting the production timelines. It's also important to remember that getting 100% color accuracy is nearly impossible. Color standards do indeed make accuracy and communication not only possible and achievable, but there are so many factors that come into play about why a color is not able to always be achieved.

That's one case when you need to throw off your designer diva hat and throw on your business hat, partner with your fabric company/manufacturer to make the best decisions together to ensure that the product is sell-able. Remember, you are one of the only people who have seen the original artwork & color intention, and will need to look at the fabric from another angle and ask yourself "Is it still sell-able?", "Does it still look good?", "Does it still set with the other prints in the line?". If so, then you have achieved success, not perfection, but success, and that's the best we can hope for!

Ok, this was a loooong post! I know many of you come from a variety of backgrounds and have your hands in all different types of pots, so I'm not sure if this information is interesting or helpful at all, but I thought I would try to bring you some of my professional background and experience and help give you some info, for those of you who this is relevant to. Hope this helps! If you have any questions, let me know, and I will try to answer.

Of course, with all of the above, there are so many other pieces of information that I didn't go into, including monitor & printer calibration, because that would make this post never-ending, and much more of a 'class', which I opted out of : )
LinkWithin

Related Posts with Thumbnails